
You may remember a while ago I published part one of this (expected to be) three part series on how to translate the roadbook into a ridden route?
Well this is part two, ways of displaying the roadbook on your bike (well some ways…) and a chart showing the approved symbols and their meaning.
It is not difficult to spend a heap of cash equivalent to the purchase price of your motorcycle on motorcycle rally equipment, however such a financial investment in order to participate in your first roadbook rally is an unrealistically high bar to participation and a bar that I wish to lower - at least for your first go at this form of motosport.
The traditional way of displaying the roadbook has been on paper, either as an actual paper book (cars) or as a long roll of paper in some form of display case.
These roadbook roll holders range from the absolute basic, home-made, with the roll being advanced by hand using the thumb wheels on the left (non-throttle) side to multi-functional, integrated, motorised, back-lit, remote operated creations of delight.
Their advantages are that they are potentially very easy devices to use, very intuitive (who struggles to understand how to work paper instructions?), potentially reliable as there are no batteries to go flat and depending on how far you wish to go with this technology can be wired-up and installed as part of a wider “suite” of rally navigation equipment.
Their disadvantages are that they can be fiddly to load (needing a new paper roll for every route), roadbook is only as strong as the paper it is printed on needing the case to be quite weatherproof, they can be physically quite large and need careful installation on bespoke engineered mounting systems. Production of the paper roll can be a headache - do you print the roadbook on a conventional printer and sellotape the pages together, is the printer ink waterproof, can you guarantee the quality of the paper if you have a roll printer, can you trust third-party roll quality….
In terms of tech development, we are at a point in history where a competing technology is available - miniature computers/palm-top/smartphones.
All smartphones have built-in GPS receivers. If you run a smartphone as a stand-alone computer you can load all your roadbooks into the phone along with all the maps (if you have a paid subscription) and whatever other apps you need to complete your weekend campaign.
There is a ready trade in used-but-still-functional smartphones (less SIM card) for less than $200. A potential problem for smartphones hard mounted on motorcycle handlebars is that vibration has been known to kill the GPS receivers - so don’t use your new phone for this, use a phone you can afford to destroy/loose/drop in a puddle. Heck, you might even get many events out of it!
An obvious challenge is keeping the smartphone “juiced-up” for a 8hour ride. In order to function effectively as a piece of navigation equipment, it needs to be turned on for the duration of your trip, most new smartphones don’t have enough battery duration for a continuous 8hour shift, so you have to have some means of charging it while using it…. If your bike doesn’t have a usb charging socket you need to install one.
The way I do this is as follows…
Second-hand iPhone - cost $100 to $200
If the phone hasn’t already been cleared of it’s previous data, clear it by “Go to Settings > General > Transfer or Reset iPhone.” and “Tap Erase All Content and Settings”.
Next, there are three apps you need to install, the mapping App Gaia (is my preference, you may have a different preference), Dropbox and Roadbook Reader.
Gaia map app from the App Store. You can download the free version and run it where you have wifi or cell phone coverage. Pay the $50 per year subscription and you can download the map of your area of interest and go out of cell range while still using the app and GPS.
Once you have signed up, use the same username and password to install Gaia onto all of your other devices that you may use in the jungle or preparing for jungle trips.
Your next requirement is a Dropbox account. This is another app from the App Store that you download onto each of the devices you plan to use.
Dropbox is a file hosting service. What does this mean…..? Not every computer/iPad/Android smartphone is able to share files directly with every other tech device. Dropbox is a app/programme that will store and hold files and everything in a manner that can be shared to other devices. From Dropbox you can share files with anyone that has the link to your Dropbox file. Therein is the security issue, only put into Dropbox what is NOT confidential or sensitive. I put all the roadbooks for publication into my Dropbox and publish the hyperlink, anyone interested then clicks on the link and they get taken to the file. The file can then be copied, shared and downloaded which for this purpose is absolutely fine.
When you install Dropbox it will ask you is you want to transfer your photos in. Say no to this because a thousand photos of your dog eating ice cream will take up a great deal of your free storage space.
Like Gaia, there is a free version and a premium version that comes at a cost of (I think) 15$ per month. 15$ per month, every month if you do not use it is quite unnecessary! The free version has 2Gigabytes of storage (really quite a lot…) and if you must, the subscription premium version has a thousand times more storage for 15$ per month.
So, in your Dropbox put only stuff that you don’t mind if Mr Putin’s “little green men” take a look at….
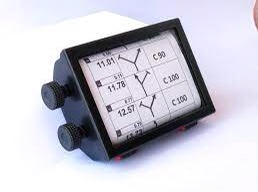
The final piece of techno-wizardry you need is an app called Rally Roadbook Reader.
This is also available in the App Store and is free to download.
This is the app that displays the roadbooks prepared in Rally Navigator. It displays simultaneously the roadbook, a GPS compass heading, a GPS speedometer (not an average speedometer…) and an elapsed time clock.


Nothing sensitive or secret about this, it is one of the routes I have published on the www.gr200.com website.
Once you have downloaded the Rally Roadbook Reader app, you need to tell the app to be able to look in Dropbox by tapping on “Import Roadbook” going to Browse, tapping on Dropbox and enabling search on Dropbox.
You are then able to download the roadbook files into Rally Roadbook Reader on your smartphone.
Total cost is the price of
a good used smartphone (you might already have one…) plus
$50 Gaia subscription plus
the cost of usb phone charging hardware to charge your phone off your bike plus
a suitable handlebar phone mount.
Relatively affordable, I hope you agree…?
Oh Yes! I also said about some charts showing the roadbook symbols and their meanings…

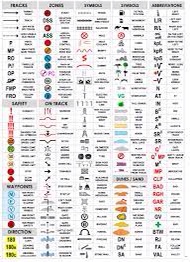


To be honest, there are many more symbols here that I have had the opportunity to use, preparing roadbooks for the GR200. To list what I have used, as far as I can remember:
Tarmac road
gravel road
gravel path
bridge
river
lake
speed limit
start flag
stop flag
catution x1, x2, x3
petrol station
restaurant/eatery
campsite
junction left/right/straight on
church
CAP heading (compass heading - no idea why it’s CAP!)
hyperlink for these: https://www.rallynavigator.com/fim_fia_roadbook_specification_cross_country
Once again, I will be very grateful for any feedback on this.
Next time, Part Trois (the 3rd). The newest navigation technowizardry that I don’t yet fully understand!
Regards, Jonathan.
Comments